Configuring an on-premises SharePoint farm

This document will guide you through the process of configuring an on-premises SharePoint farm in SharePoint Manager Plus.

Step 1: Create a farm admin account

Create a user account with the permissions listed below to configure an on-premises SharePoint farm server.

  1. Ensure the user is a member of the built-in administrator group of the SharePoint server.
  2. Ensure the user is a member of the Farm Administrators group. Open Central Administration and add the user to the Farm Administrators group if they haven't been added previously.
  3. Ensure the user has access to all SharePoint databases; i.e., they need the SQL Server SharePoint_Shell_Access database role in all SharePoint databases, including the configuration database and all content databases.

    To assign this role to the user through a PowerShell script, open PowerShell on the SharePoint server and run the following:

    • Add-PSSnapin Microsoft.SharePoint.PowerShell
    • Get-SPDatabase | Add-SPShellAdmin DOMAIN\UserName [ Replace DOMAIN\UserName with actual User account]

    Alternatively, you can do this by opening SQL Server Management Studio and assigning the DBCREATOR, SECURITYADMIN, and SYSADMIN server roles to the user.

    Also, ensure the user has the DBOWNER privilege over all the SharePoint databases.

  4. Ensure the user has the Full Control privilege over all the web applications. Open Central Administration. In the Manage web applications section, select each web application, click the User Policy option on the top ribbon, and add the user with the Full Control privilege.
  5. Ensure the user has the Full Control privilege over all the web applications. Open Central Administration. In the Manage web applications section, select each web application, click the User Policy option on the top ribbon, and add the user with the Full Control privilege.

    To assign it through PowerShell, run the script below on the SharePoint server:

    Add-PSSnapin Microsoft.SharePoint.PowerShell
    $user = "DOMAIN\UserName"
    $displayName = "User Display Name"
    Get-SPWebApplication | foreach { `
    $policy = $_.Policies.Add($user,$displayName) `
    $role = $_.PolicyRoles.GetSpecialRole([Microsoft.SharePoint.Administration.SPPolicyRoleType] ::FullControl) `
    $policy.PolicyRoleBindings.Add($role) `
    $_.Update() `
    }
  6. Ensure the user account has administrator access to all site collections in order to fetch in-depth reports about site collections.

Step 2: Configure the required local Group Policy settings

Skip this step if SharePoint Manager Plus is installed on the SharePoint server and go to the next step.

The Group Policy settings need to be configured to enable CredSSP on both the server and client to allow user credential delegation for Windows Remote Management (WinRM) on your target machine in the domain.

  1. Open the Group Policy settings on the machine where SharePoint Manager Plus is installed and set the following policy values:
    • Go to Computer Policy > Administrative Templates > System > Credentials Delegation. Set Allow delegating fresh credentials to Enabled, add WSMAN/* to the list of servers (e.g., WSMAN/mysharepointserver.domain.com), and check the box for Concatenate OS defaults with input above.
    • Go to Computer Policy > Administrative Templates > System > Credentials Delegation. Set Allow delegating fresh credentials with NTLM-only server authentication to Enabled, add WSMAN/* to the list of servers (e.g., WSMAN/mysharepointserver.domain.com), and check the box for Concatenate OS defaults with input above.
    • Go to Computer Policy > Administrative Templates > Windows Components > Windows Remote Management (WinRM) > WinRM Client. Set Allow CredSSP authentication to Enabled.
  2. Open the Group Policy settings on the SharePoint server and set the following policy values:
    • Go to Computer Policy > Administrative Templates > Windows Components > Windows Remote Management (WinRM) > WinRM Service. Set Allow CredSSP authentication to Enabled.

Step 3: Enable remote PowerShell

a) If the product is installed on the SharePoint server

  1. Remote PowerShell management (WinRM) does not need to be enabled if the product is installed on the SharePoint server. However, you need to add the farm admin account as the logon account for the SharePoint Manager Plus service.

b) If the product is not installed on the SharePoint server

  1. Perform the actions below on the SharePoint server machine:
    • Open PowerShell as an administrator and run the commands below. Check if any Public network connection is available on the machine; if so, change it to Domain or Private and proceed.
      Enable-PSRemoting -Force
      Enable-WSManCredSSP -Role Server -Force
    • Increase the maximum memory allocated per shell; the recommended size is 1,024MB.

      Get-Item wsman:\localhost\shell\MaxMemoryPerShellMB (To check the current PowerShell memory size)

      Set-Item wsman:\localhost\shell\MaxMemoryPerShellMB -Value 1024 -Force (Run this only if the memory is less than 1,024MB)

      Set-Item wsman:\localhost\Plugin\Microsoft.PowerShell\Quotas\MaxMemoryPerShellMB -Value 1024 -Force (Run this only if the memory is less than 1,024MB)

      Restart-Service WinRM

    • Increase the maximum concurrent shells allowed per user; the recommended count is 30.

      Get-Item wsman:\localhost\shell\MaxShellsPerUser (To check the maximum concurrent shells allowed per user)

      Set-Item wsman:\localhost\shell\MaxShellsPerUser -Value 30 -Force (Run this only if the count is less than 30)

      Restart-Service WinRM

  2. Perform the action below on the machine where SharePoint Manager Plus is installed:
    • Open PowerShell as an administrator and run the commands below. Check if any Public network connection is available on the machine; if so, change it to Domain or Private and proceed.

      Enable-PSRemoting -Force

      Enable-WSManCredSSP -Role Client -DelegateComputer "server.domain.com" (The fully qualified domain name (FQDN) of the SharePoint server)

    Note: If the SharePoint server and the machine where SharePoint Manager Plus is installed are in different domains, run the commands below on the machine where SharePoint Manager Plus is installed.

    Enable-PSRemoting -Force

    Set-Item WSMan:\localhost\Client\TrustedHosts -Value "server.domain.com" (The FQDN of the SharePoint server) -Concatenate -Force

    Restart-Service WinRM

Verifying port connectivity for WinRM

Perform the action below on the machine where SharePoint Manager Plus is installed to check whether port 5985 is open for WinRM.

  1. Open PowerShell as an administrator, run the command below, and check if TcpTestSucceeded is True.
    Test-NetConnection <sharepoint_server_name> -Port 5985
    Verifying port connectivity for WinRM to configure a SharePoint farm server

Step 4: Check for proper configuration

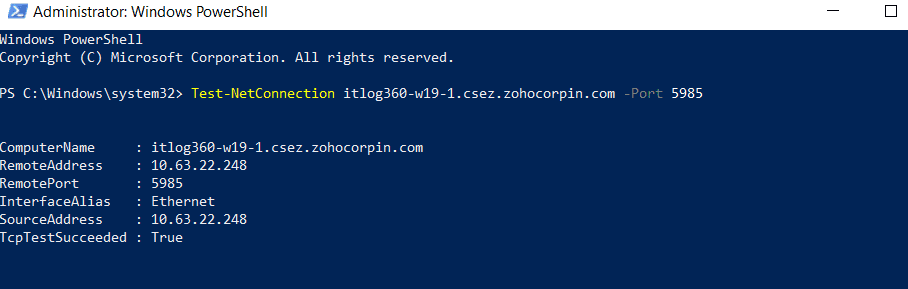
Once the commands above are executed successfully, follow the step below to check if the SharePoint server is reachable from the machine where SharePoint Manager Plus is installed.

  1. On the machine where SharePoint Manager Plus is installed, open PowerShell as an administrator and run the following command:

    Enter-PSSession -ComputerName "FQDN_of_SharePoint_Server_name" -Credential "DOMAIN\farm_admin_username" -Authentication CredSSP (Hit Enter and type the password in the opened prompt)

    Add-PSSnapin Microsoft.SharePoint.PowerShell

    Get-SPFarm

The command above should display the name of the SharePoint farm to which you are about to connect. If it's displayed, your connection is successful. Now, proceed to connect to the SharePoint farm using SharePoint Manager Plus.

If you face any errors when executing the script above, follow the troubleshooting steps given in this document.

Step 5: Add an on-premises farm server

Adding an on-premises SharePoint farm in SharePoint Manager Plus

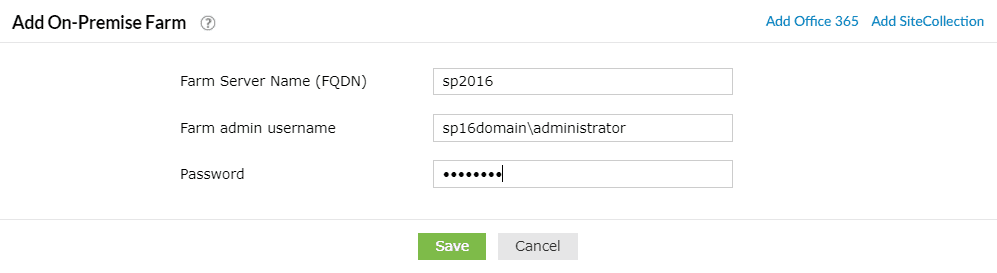
In the Add On-Premise Farm dialog box:

  1. Provide the FQDN of the SharePoint server that is to be added (preferably any one of the web front-end servers or the server machine where Central Administration is available).
  2. Specify the farm admin credentials to add the farm server for monitoring.

Note: If you face any error while configuring your on-premises SharePoint farm, follow the troubleshooting steps.

Copyright © 2025, ZOHO Corp. All Rights Reserved.